How to set up a backend FastAPI server on nginx (or: I am bad at devops)
I’m setting up a new backend server for a silly side project I’m working on, and every time I do this I forget all the steps I need to follow.
These steps are for a FastAPI server, served through nginx running on a Unix box (an Amazon EC2 instance running Ubuntu). My wonderful husband set up the nginx server over a decade ago. I’m just a tenant (hopefully a quiet tenant who is getting their security deposit back). Therefore, some of these instructions might also only work on 10-year-old systems with slightly idiosyncratic setups, but I think most of the steps are the same for most servers.
Step 0: Build your FastAPI server
This blog post doesn’t include how to do that. There are great docs on the project homepage, though. I had 0 experience with FastAPI a week ago and I have a working API today, so the docs must be great.
Step 1: Buy a domain
I used Cloudflare.
Step 2: Point the domain to existing host
What is my IP? IDK. I have other domains proxied by Cloudflare and they all point to the same place, so…that’s my IP. (I think the real answer is, look in the AWS console.) I setup an A record for the root domain (.mydomain.com) pointing to Github Pages and for my API (api.mydomain.com) pointing to my server’s IP.
Step 3: Set up a basic ngnix config listening on port 80.
To do this, we SSH into the server and add a config to /etc/nginx/sites-available/mysite.
server {

 root /path/to/site/content;
 index index.html index.htm;

 server_name yourdomain.com;

 location / {
  # First attempt to serve request as file, then
  # as directory, then fall back to displaying a 404.
  try_files $uri $uri/ =404;
 }
 listen 80;
}
Step 4: Test the nginx config
sudo nginx -t will let you know if you have any syntax errors, which is important, because if you reload nginx while one of the config files for any site in sites-available is in a bad state, they all go down. Once you get the all-clear, though, you can do sudo nginx -s reload. (Or in my case, sudo /etc/init.d/nginx reload which may be for Weird Computer but also has some nice failsafes in it, like checking the config again).
Step 5: Turn on your site
Symlink your new config to /etc/nginx/sites-enabled/mysite. When the site is in sites-enabled it is up and able to receive traffic.
Step 6: Enable HTTPS
Run certbot to auto-detect the new config and automatically enable https. I cannot stress how magical this is.
Step 7: Configure Github Pages
Basically, this is pretty much as simple as following the instructions here, but if you’re using Cloudflare you have to turn off proxying as it doesn’t play well, see this tutorial for more info.
Step 8: Run FastAPI on the server
There are a few ways to set this up, but because the server already has pm2 installed, the easiest way for me to get this going was to add this to my app’s entrypoint:
 if __name__ == "__main__":
    import uvicorn
    uvicorn.run(app, host="0.0.0.0", port=8013)
Here, app is the object returned from calling FastAPI() in your class, and the port is randomly chosen to avoid conflicts with other stuff on this server.
Then all I need to do is run pm2 start myapp.py --name my_app --interpreter python3 and the server is up and stays up. Who knew pm2 could run Python? I didn’t. I can now easily check the status of my app with pm2 status and check the logs at ~/.pm2/logs/my_app-out.log and ~/.pm2/logs/my_app-error.log which was useful for debugging in step 10.
Step 9: Update the nginx config to point to FastAPI
location / {
// replace the OG location config with
      proxy_pass http://127.0.0.0:8013;
 }
Now we can make API requests to this URL and nginx will pass them to FastAPI, which will handle them!
…Except apparently we need to proxy all routes. Thankfully I only have a handful:
location /register {
   proxy_pass http://127.0.0.0:8013;
 }
 ... etc
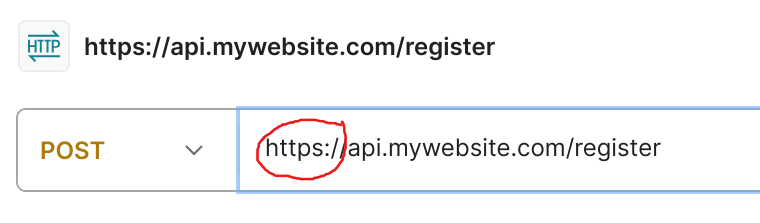
Step 10: Test
I used Postman, but you do you. Just note that unless you explicitly put the protocol in the URL, Postman will default to http, and then nginx will redirect to https, and 301 redirects must never redirect POST requests, according to this Serverfault answer.
Apparently the way most clients get around this is by converting a redirected POST to a GET, which is technically not in violation of the HTTP spec, but FastAPI did not like that one bit, as one of my routes only has a POST method handler. After a bunch of frantic searching I realized I just had to explicitly specify the protocol in my test Postman call and bingo. (Why does postman default to HTTP in 2025? No clue).
So that’s it. The API is now up and receiving requests, and the silly side project is almost done. I can’t wait for it to be finished so I can post about it!
Chaser: Remember that being bad at devops is normal
I don’t think this video is actually parody?